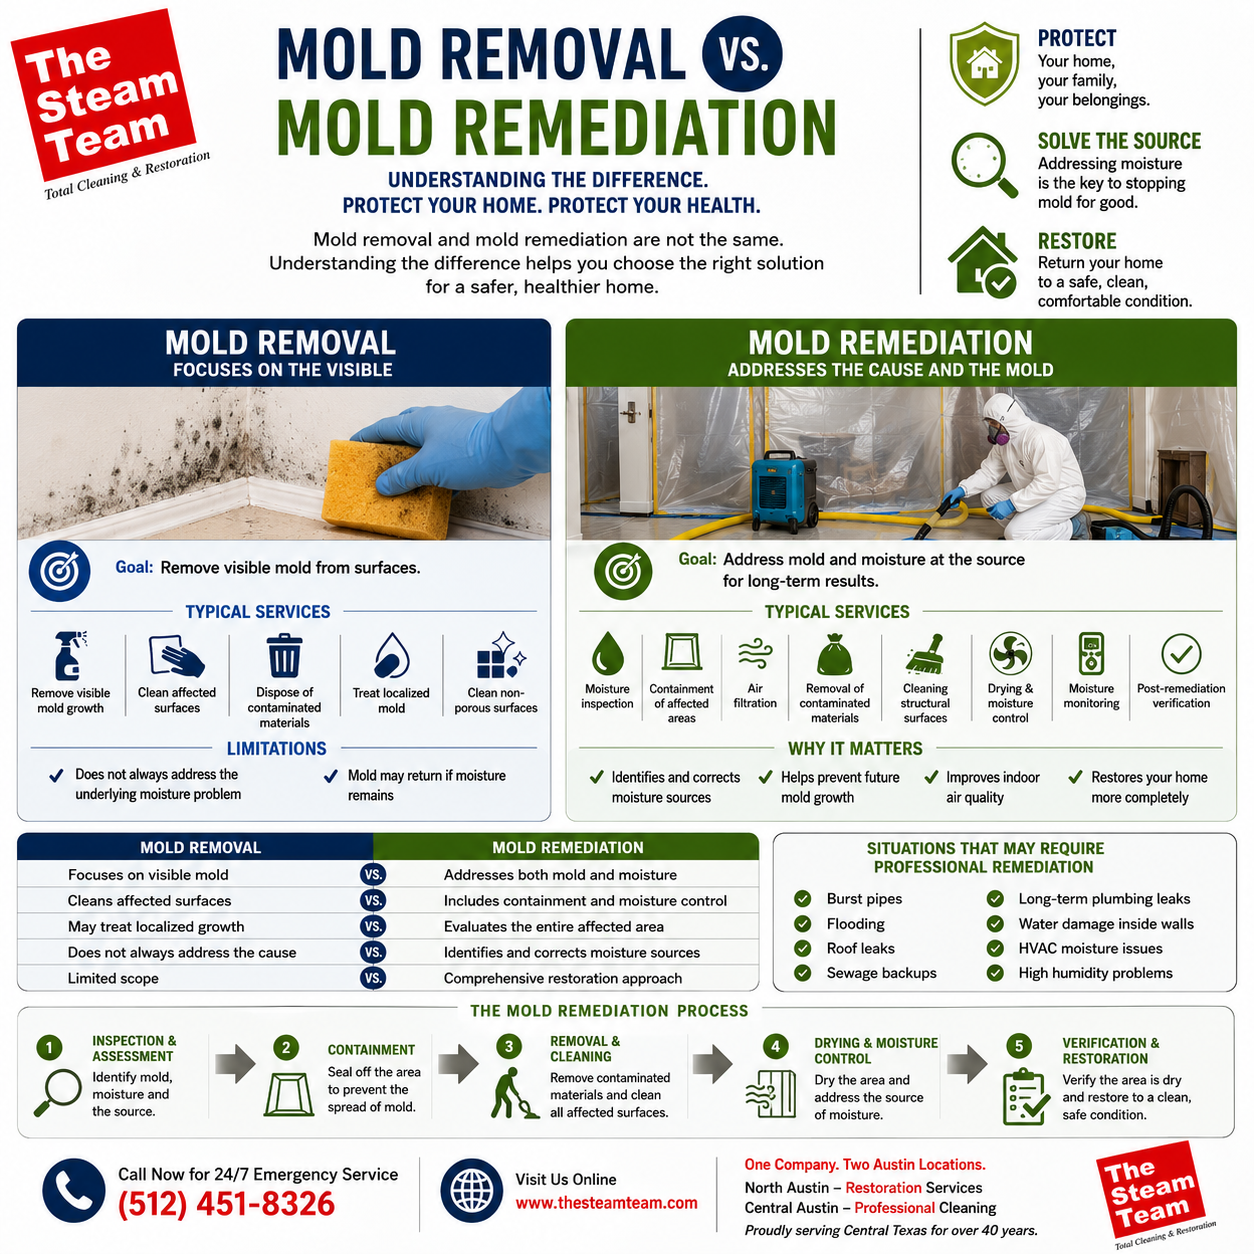
Mold Removal vs. Remediation Explained
Mold removal and mold remediation are related, but distinct approaches to dealing with mold in buildings, and understanding that difference is essential for protecting health and property in Austin’s humid climate. Mold removal typically refers to cleaning or stripping visible mold from surfaces, while mold remediation is a comprehensive process that identifies moisture sources, contains contamination, removes affected materials, and prevents recurrence. Homeowners and property managers searching for "mold removal process Austin" or "mold remediation vs removal" need clear guidance to decide when a DIY cleanup is sufficient and when professional intervention is required. This article explains both approaches, walks through professional remediation steps, compares scope and cost considerations, outlines health risks of untreated mold, and provides practical next steps to get an inspection or quote. Throughout, we integrate local context for Austin and Central Texas, describe inspection checklists and documentation helpful for insurance, and show how professional standards and equipment reduce recurrence risk.
What Is Mold Removal and When Is It Appropriate?
Mold removal is the targeted cleaning of visible mold growth on surfaces and materials, and it works by physically eliminating colonies and spores from accessible areas. The mechanism typically involves agitation, detergents or specialized cleaners, and removal of contaminated non-porous materials to reduce surface-level spore counts and immediate staining. Removal delivers the specific benefit of restoring visibly affected finishes quickly and is often an appropriate first step for small, well-contained patches on hard, non-porous surfaces. However, removal does not usually include addressing hidden reservoirs, moisture sources, or verification testing, so its long-term effectiveness depends on the absence of persistent humidity or leaks. The following subsections explain how removal is performed and where it falls short, leading naturally into remediation methods that aim to prevent recurrence.
How Does Mold Removal Work to Eliminate Visible Mold?
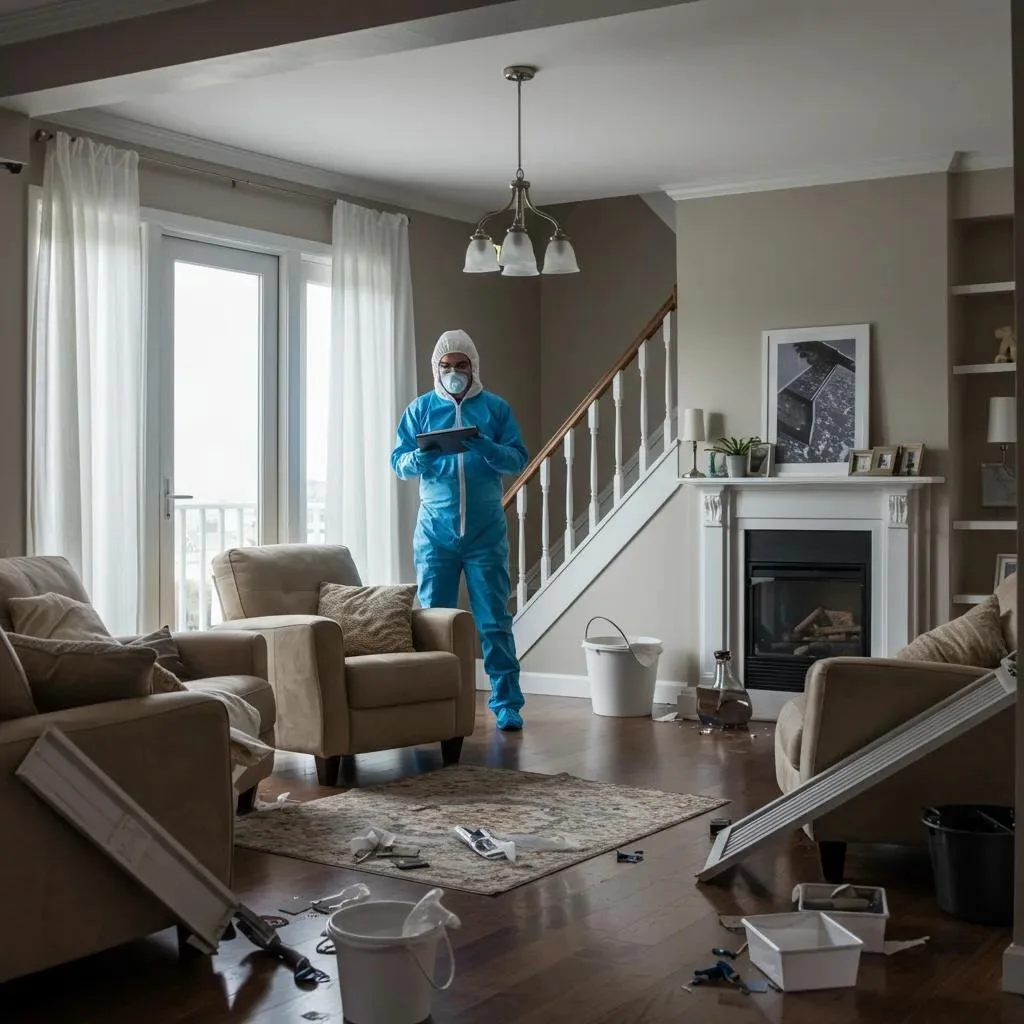
Mold removal eliminates visible colonies using mechanical cleaning, detergents, and targeted biocides when appropriate, and technicians or DIYers remove residue until surface staining and growth are reduced. Effective removal begins with containment of the work area, personal protective equipment (PPE) such as gloves and respirators, and careful disposal of contaminated cleaning materials to avoid cross-contamination. Common tools include scrapers, brushes, HEPA-filtered vacuums for settled spores, and antimicrobial cleaners suited to the material; these tools reduce airborne and surface spore loads when used correctly. Because removal focuses on visible growth, it is most effective on small patches and hard surfaces; hidden mold behind drywall or inside insulation often remains unaddressed, which is why removal can be temporary unless moisture drivers are fixed. Understanding these limitations sets up the need for broader remediation strategies that include moisture control and verification.
What Are the Limitations of Mold Removal for Long-Term Mold Control?
Although mold removal can restore appearance and reduce immediate spore counts, it often fails to prevent recurrence when moisture sources or hidden contamination remain, and this limitation can create a false sense of security. Porous materials like drywall, carpet, and insulation trap spores and mycelial fragments below the surface where surface cleaning cannot reach, so removal may only treat symptoms rather than the cause. Additionally, without moisture diagnosis using moisture meters and infrared scans, removal teams can miss foundation seepage, roof leaks, or HVAC condensation that will promote regrowth. For these reasons, properties with recurring mold, health-sensitive occupants, or widespread contamination are better served by remediation that includes source repairs, containment, and post-remediation verification. These factors point directly to when to escalate from removal to a full remediation approach.
What Is Mold Remediation and Why Is It a Comprehensive Solution?
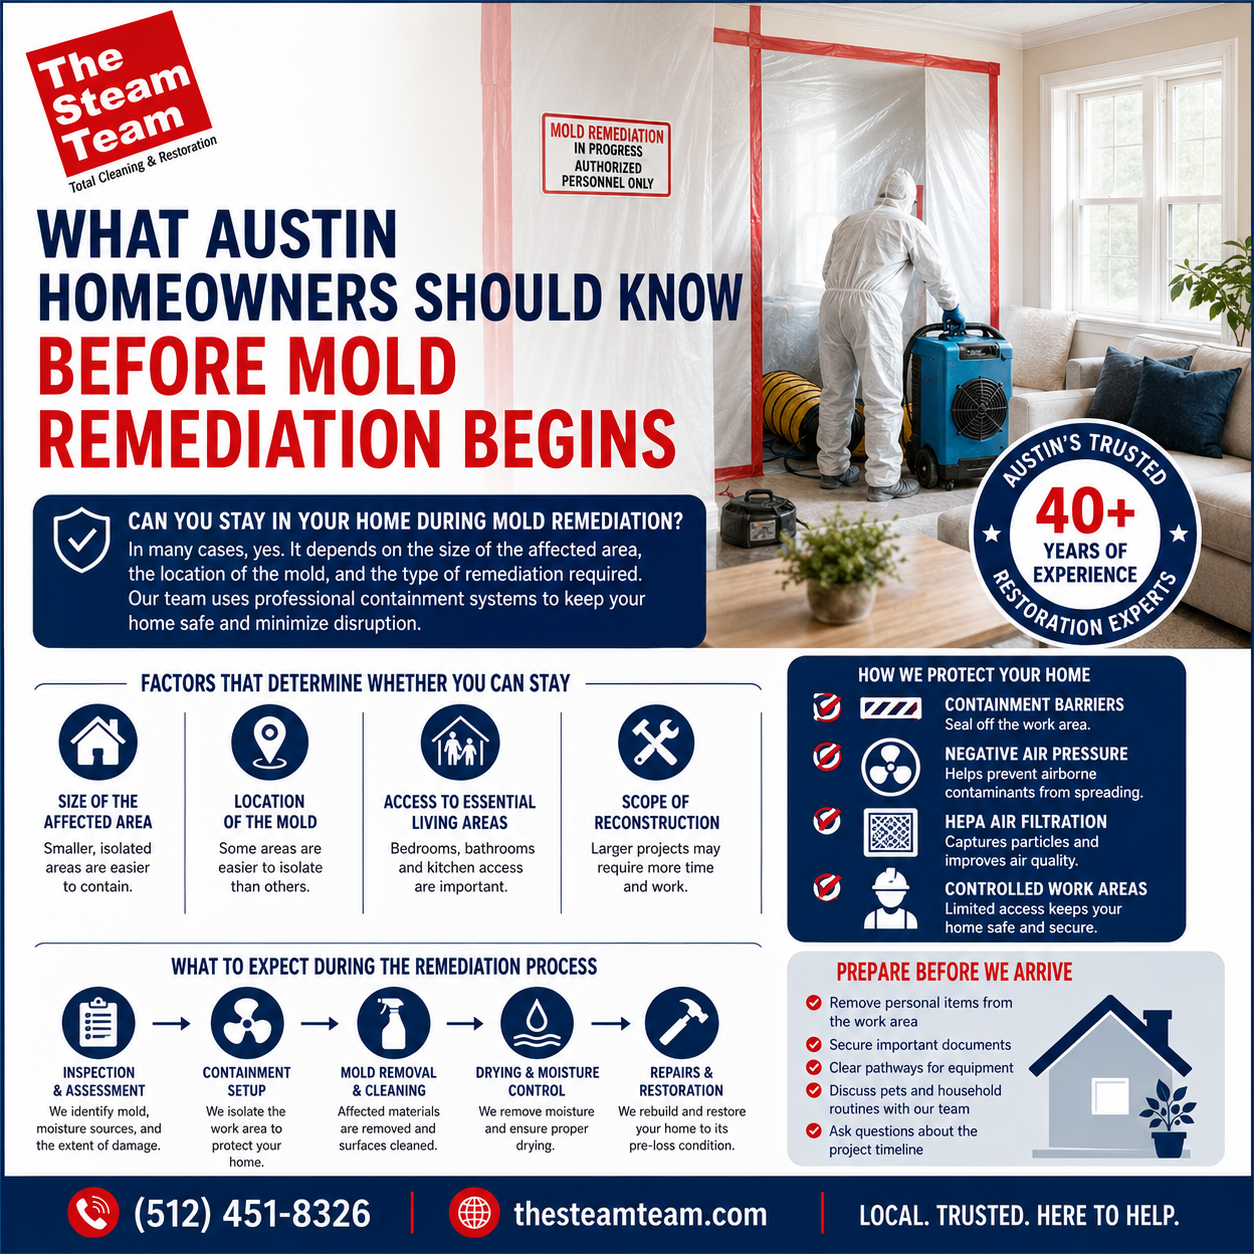
Mold remediation is a multi-phase process that identifies contamination, contains affected areas, removes source materials, treats remaining surfaces, and implements measures to prevent future growth, producing a durable outcome for indoor air quality and structural integrity. The mechanism of remediation centers on interrupting the mold lifecycle by eliminating moisture drivers and isolating spores during removal, which reduces both settled and airborne spore loads and mitigates health risks. The benefits of remediation include long-term control of mold recurrence, documented results for insurance and property transactions, and measurable improvements to indoor air quality when performed to professional standards. The remediation workflow relies on diagnostic tools, containment strategies, HEPA air filtration, and coordinated repairs, and the next subsection lists the key steps used by professionals and the measurable outcomes associated with each step.
What Are the Key Steps in Professional Mold Remediation?
Professional remediation proceeds through a defined sequence: inspection and testing, containment, air filtration, removal of affected materials, thorough cleaning, drying and moisture control, repairs, and post-remediation verification, each step linked to specific tools and expected metrics. Inspection uses visual assessment, moisture meters, and targeted sampling to map contamination; containment uses barriers and negative air pressure to prevent spread; and HEPA air scrubbing reduces airborne spore counts during work. The table below maps each major remediation step to common tools/methods and the expected measurable result, helping owners understand how process choices create outcomes.
Introductory table showing remediation steps, tools used, and measurable outcomes:
Step
Tools / Methods
Expected Result / Metric
Inspection & Testing
Moisture meters, infrared, visual mapping
Identifies moisture % and problem areas
Containment
Plastic barriers, negative air machines
Limits spread; maintains negative pressure
Air Filtration
HEPA air scrubbers, HEPA vacuums
Reduces airborne spores (CFU reduction)
Material Removal & Cleaning
Demolition tools, antimicrobial cleaners
Removes colonized materials and surface residue
Drying & Repairs
Industrial dehumidifiers, structural drying
Restores safe moisture levels (%)
This mapping clarifies how remediation transforms assessment into verifiable improvements, and understanding tool-to-result relationships helps property owners evaluate quotes and contractor processes. The next paragraph explains how remediation addresses root causes, which is essential for sustained results.
After outlining the technical workflow above, it's helpful to consider local service options. The Steam Team offers mold mitigation and sanitation as part of its restoration services in Austin, combining local experience with professional equipment and standards. The Steam Team's approach emphasizes IICRC-certified technicians, 24/7 emergency availability, and coordinated moisture control to prevent recurrence, making their mitigation and sanitation service a practical example of professional remediation in Central Texas.
How Does Mold Remediation Address the Root Cause of Mold Growth?
Remediation addresses root causes by diagnosing moisture sources such as plumbing leaks, roof or foundation infiltration, and HVAC condensation, and then coordinating repairs or humidity-control measures to remove the environmental conditions that support mold. Techniques include targeted drying with dehumidifiers, structural repairs to stop water entry, and HVAC adjustments or ventilation upgrades to control relative humidity and prevent condensation. By combining source control with removal of contaminated materials, remediation breaks the mold lifecycle and reduces the likelihood of regrowth, delivering a structural and environmental fix rather than a cosmetic one. This root-cause focus is essential in humid climates like Austin, where ambient moisture and seasonal storms increase the probability of hidden water intrusion.
What Are the Main Differences Between Mold Removal and Mold Remediation?
The main differences between mold removal and mold remediation lie in scope, goals, duration, cost, and measurable outcomes: removal is surface-focused and shorter-term, while remediation is comprehensive, corrective, and documented for long-term control. Removal aims to clean visible mold and restore appearance quickly, whereas remediation aims to identify and eliminate the underlying moisture problem and confirm that contamination no longer poses a health or structural risk. Timeframes differ as well: removal can be a same-day task for small areas, while remediation often requires multi-day drying, repairs, and verification testing. The comparison table below summarizes these attributes so homeowners and managers can quickly decide which option aligns with their risk tolerance and property condition.
Introductory comparison table outlining scope and outcomes:
Approach
Scope
Goal
Mold Removal
Visible surface cleaning
Immediate appearance restoration
Mold Remediation
Inspection, containment, removal, repairs, verification
Long-term elimination of mold sources and recurrence prevention
Combined/Interim
Targeted removal plus monitoring
Short-term control while planning repairs
This side-by-side view shows how remediation delivers broader, verifiable results, while removal addresses immediate visible problems; the next subsection compares effectiveness and practical decision thresholds for owners.
How Do Scope, Effectiveness, and Duration Compare Between Removal and Remediation?
Removal provides a fast, limited-scope solution effective for small, non-porous areas but offers limited prevention because hidden contamination or ongoing moisture remains unaddressed. Remediation is more effective at reducing overall indoor spore loads and preventing recurrence because it includes moisture diagnosis, containment, and post-work verification, though it requires longer timelines and higher upfront investment. Duration and cost trade-offs favor removal for isolated aesthetic issues but favor remediation for properties with health-sensitive occupants, wide-area contamination, or repeated outbreaks. Concrete decision-making should weigh size of affected area, material type, occupant vulnerability, and signs of ongoing water intrusion, which the next section translates into practical decision criteria for choosing the right path.
When Should You Choose Mold Removal vs. Mold Remediation for Your Property?
Deciding between removal and remediation depends on measurable thresholds and risk factors: small isolated spots on non-porous surfaces often qualify for removal, while larger areas, porous material involvement, recurring growth, or health concerns necessitate remediation. Consider these decision rules:
If contamination is under roughly 10 square feet and limited to non-porous surfaces, removal may suffice.
If contamination is widespread, involves drywall/insulation/carpet, or follows water damage, choose remediation.
If occupants include children, elderly, or immunocompromised individuals, remediation’s verification and containment are advisable.
These criteria help owners translate visual inspection into action, and the subsequent section explores health risks that increase the urgency for remediation when present.
What Are the Health Risks and Property Dangers of Untreated Mold?
Untreated mold can degrade indoor air quality and contribute to respiratory symptoms, allergic reactions, and exacerbation of asthma, especially for vulnerable populations, making timely assessment and mitigation important for health protection. Mold spores and microbial volatile organic compounds (mVOCs) can increase particulate counts indoors, aggravating allergies and lung irritation in occupants; chronic exposure in poorly ventilated spaces can perpetuate symptoms. From a property perspective, prolonged moisture and microbial growth accelerate material deterioration, reduce thermal performance of insulation, and may compromise structural elements if left unchecked. Recognizing these health and property risks motivates owners to choose remediation when mold is persistent or when occupants report symptoms.
How Can Mold Exposure Affect Indoor Air Quality and Health?
Mold exposure can elevate airborne spore concentrations and release mVOCs that contribute to cough, nasal congestion, throat irritation, and for some people, more severe allergic or asthmatic responses, with children, older adults, and immunocompromised individuals at higher risk. Indoor air quality metrics like airborne particle counts and humidity levels correlate with mold growth potential and symptom exacerbation, and recent studies indicate that reducing indoor humidity and removing colonized materials lowers symptom burden for sensitive occupants. Seeking medical advice is appropriate when occupants experience persistent respiratory or allergic symptoms coinciding with visible mold or dampness, which underscores the public-health rationale for remediation over simple surface cleaning in many cases. The next section explains why professionals deliver added safety and documentation benefits.
Why Is Professional Mold Remediation Important for Protecting Your Home or Business?
Professional remediation brings value through thorough diagnosis, containment practices that protect unaffected areas, verified reduction in airborne spore counts, and documentation that supports insurance claims or property transactions. Professionals use moisture meters, HEPA filtration, negative pressure containment, and standard operating procedures to limit cross-contamination and provide measurable post-remediation verification. This documentation streamlines insurance interactions and helps property owners demonstrate that remediation met recognized practices, reducing liability and increasing confidence in long-term outcomes. For homeowners and businesses facing recurrent issues or health-sensitive occupants, professional remediation reduces recurrence risk and preserves indoor air quality more effectively than DIY removal alone.
How Does The Steam Team’s Mold Remediation Process Stand Out in Austin, Texas?
The Steam Team positions its mold mitigation and sanitation within a restoration framework tailored for Austin and Central Texas, combining local climate awareness with certified technicians, emergency responsiveness, and service coordination that addresses moisture sources as well as contamination. Their technicians are IICRC certified and trained to perform inspection, containment, HEPA air filtration, and coordinated repairs, which aligns process steps to measurable verification outcomes and insurance documentation needs. The company offers 24/7 emergency response for time-sensitive water events and frames mitigation as part of broader restoration services including water and fire damage response, which helps manage connected risks after a storm or leak. These trust signals local expertise, certifications, and emergency availability help homeowners select a provider who understands Central Texas humidity and the specific moisture drivers common in Austin homes. Provide useful information about cleaning and restoration services, build trust, and lead potential clients to request a quote or schedule an appointment.
What Certifications and Experience Do The Steam Team’s Technicians Have?
The Steam Team’s field technicians are presented as IICRC-certified professionals who follow industry standards for inspection, containment, drying, and remediation, and these certifications matter because they indicate training in protocols that reduce cross-contamination and improve verification. Certification implies technicians are familiar with moisture diagnostics, negative pressure containment, and HEPA filtration methods that produce measurable improvements in indoor air quality and surface cleanliness. Local experience in Austin and Central Texas helps technicians anticipate climate-driven moisture patterns and prioritize source repairs or ventilation adjustments accordingly. Emphasizing certified procedures gives property owners more confidence in documentation and long-term outcomes, and the following subsection explains specific mitigation practices the team uses to prevent recurrence.
How Does The Steam Team Ensure Comprehensive Mold Mitigation and Prevention?
The Steam Team’s mitigation practice emphasizes containment, HEPA air filtration, moisture measurement, and coordination with repair professionals to resolve leaks or structural vulnerabilities that allow mold to return. Their process ties each remediation phase to verification metrics, moisture percentage targets, post-work air clearance checks, and documented containment to provide evidence of effective mitigation. With 24/7 emergency availability, they can respond to water events quickly to limit mold development, and their integration of mitigation with water and fire restoration services streamlines recovery for affected properties. These measures combine technical control with local responsiveness to reduce recurrence risk and support property longevity.
How Can You Get Started with Professional Mold Removal or Remediation Services in Austin?
Starting professional services begins with scheduling an inspection that documents visible growth, checks moisture levels, and identifies potential sources; a clear inspection-to-quote workflow helps owners plan remediation or removal with predictable timelines and costs. Expect the inspection to include a visual survey, moisture mapping, possible targeted sampling, and a written scope with options for remediation or removal depending on findings. The table below outlines a concise inspection checklist that technicians commonly use, helping owners prepare for the visit and understand what information will inform a quote.
Introductory inspection checklist table:
Area Inspected
Test Used
What Technician Looks For
Walls & Ceilings
Moisture meter, visual
Elevated moisture %, staining, soft materials
Flooring & Subfloor
Probe meter, infrared
Saturation, odor, delamination
HVAC & Ducts
Visual, particle sampling
Condensation, microbial growth, and filter condition
Crawlspaces/Basement
Humidity meter, inspection
Water intrusion, grading, and venting issues
This checklist clarifies the inspection scope and the data that feeds a remediation or removal quote; the next subsection describes how to contact and prepare for an emergency response.
What Should You Expect During a Mold Inspection and Quote Process?
During inspection, technicians will gather visual evidence, moisture readings, and contextual information about recent water events; they will then produce a quote that separates containment, remediation labor, material removal, drying equipment, and repair coordination. Timeline from inspection to written quote typically ranges from same-day to a few days, depending on sampling needs, and well-documented scopes include recommended verification steps and expected post-remediation checks. Factors that influence the quote include the affected area size, materials involved, accessibility, and required repairs to stop moisture; clear documentation also helps if owners pursue insurance claims. Preparing photos, records of leaks, and occupant health concerns reduces back-and-forth and speeds decision-making about remediation versus targeted removal.
How Can You Contact The Steam Team for Emergency Mold Remediation or Consultation?
When immediate action is necessary, The Steam Team offers 24/7 emergency response to address water events that create mold risk, and contacting them for an emergency inspection initiates rapid mitigation steps like temporary water removal and structural drying to limit microbial growth. Provide basic information about the affected area, recent water incidents, and any health concerns so technicians can prioritize safety and containment upon arrival. Expect an initial assessment that focuses on stopping water intrusion and reducing humidity, followed by a more detailed remediation scope and quote after stabilization. Provide useful information about cleaning and restoration services, build trust, and lead potential clients to request a quote or schedule an appointment.
Frequently Asked Questions
What are the signs that I need mold remediation instead of just removal?
If you notice widespread mold growth, especially on porous materials like drywall or carpet, or if mold keeps returning after removal, it's time for remediation. Other signs include persistent moisture issues, musty odors, or health symptoms among occupants, such as respiratory problems or allergies. Remediation is essential when the mold covers an area larger than 10 square feet or when it affects vulnerable populations, such as children or the elderly. Addressing the root cause of mold growth is crucial for long-term health and safety.
How can I prevent mold growth after remediation?
To prevent mold growth after remediation, focus on controlling moisture levels in your home. This can be achieved by fixing leaks, improving ventilation, and using dehumidifiers in humid areas. Regularly inspect areas prone to moisture, such as basements and bathrooms, and ensure that gutters and downspouts direct water away from your foundation. Additionally, consider using mold-resistant materials during repairs and maintaining indoor humidity levels below 60% to create an environment less conducive to mold growth.
Is DIY mold removal effective for larger infestations?
DIY mold removal is generally not effective for larger infestations, especially those exceeding 10 square feet or involving porous materials. While small patches on non-porous surfaces can be managed with proper cleaning techniques, larger infestations often require professional remediation to ensure thorough removal and to address underlying moisture issues. Professionals have the tools and expertise to contain the mold, prevent cross-contamination, and verify that the problem has been fully resolved, which is crucial for long-term safety.
What should I do if I suspect mold in my home?
If you suspect mold in your home, the first step is to conduct a visual inspection for signs of mold growth or water damage. If you find mold or if occupants are experiencing health issues, contact a professional mold remediation service for a thorough inspection and assessment. Avoid disturbing the mold, as this can release spores into the air. Document any visible mold and moisture issues, as this information will be helpful for the remediation team and any potential insurance claims.
How long does the mold remediation process typically take?
The duration of the mold remediation process can vary significantly based on the extent of the infestation and the specific conditions of the property. Generally, small-scale remediation can take a few days, while larger or more complex cases may require a week or more. Factors influencing the timeline include the size of the affected area, the materials involved, and the need for repairs or drying. A professional assessment will provide a more accurate estimate based on the specific situation.
Are there any health risks associated with mold remediation?
While professional mold remediation is designed to minimize health risks, there can still be potential hazards, especially if proper safety protocols are not followed. During the process, mold spores can become airborne, which may pose risks to sensitive individuals. Professionals use protective gear and containment measures to limit exposure. It's essential to ensure that the remediation team follows industry standards to protect both workers and occupants from potential health issues related to mold exposure.
What should I look for when choosing a mold remediation service?
When selecting a mold remediation service, look for certified professionals with experience in mold assessment and remediation. Check for certifications such as IICRC, which indicate adherence to industry standards. Read reviews and ask for references to gauge their reputation. Ensure they provide a clear scope of work, including inspection, containment, removal, and post-remediation verification. Transparency in pricing and documentation for insurance claims is also important to ensure you receive quality service and protection for your property.
Conclusion
Understanding the differences between mold removal and mold remediation is crucial for maintaining a healthy living environment and protecting your property. While removal may provide a quick fix for visible mold, remediation addresses the root causes, ensuring long-term prevention and improved indoor air quality. For homeowners in Austin, choosing professional mold remediation services can significantly reduce health risks and enhance property value. Contact The Steam Team today to schedule an inspection and take the first step towards a mold-free home.