Real Austin Case Study — From Flooded Living Room to Fully Restored Home
/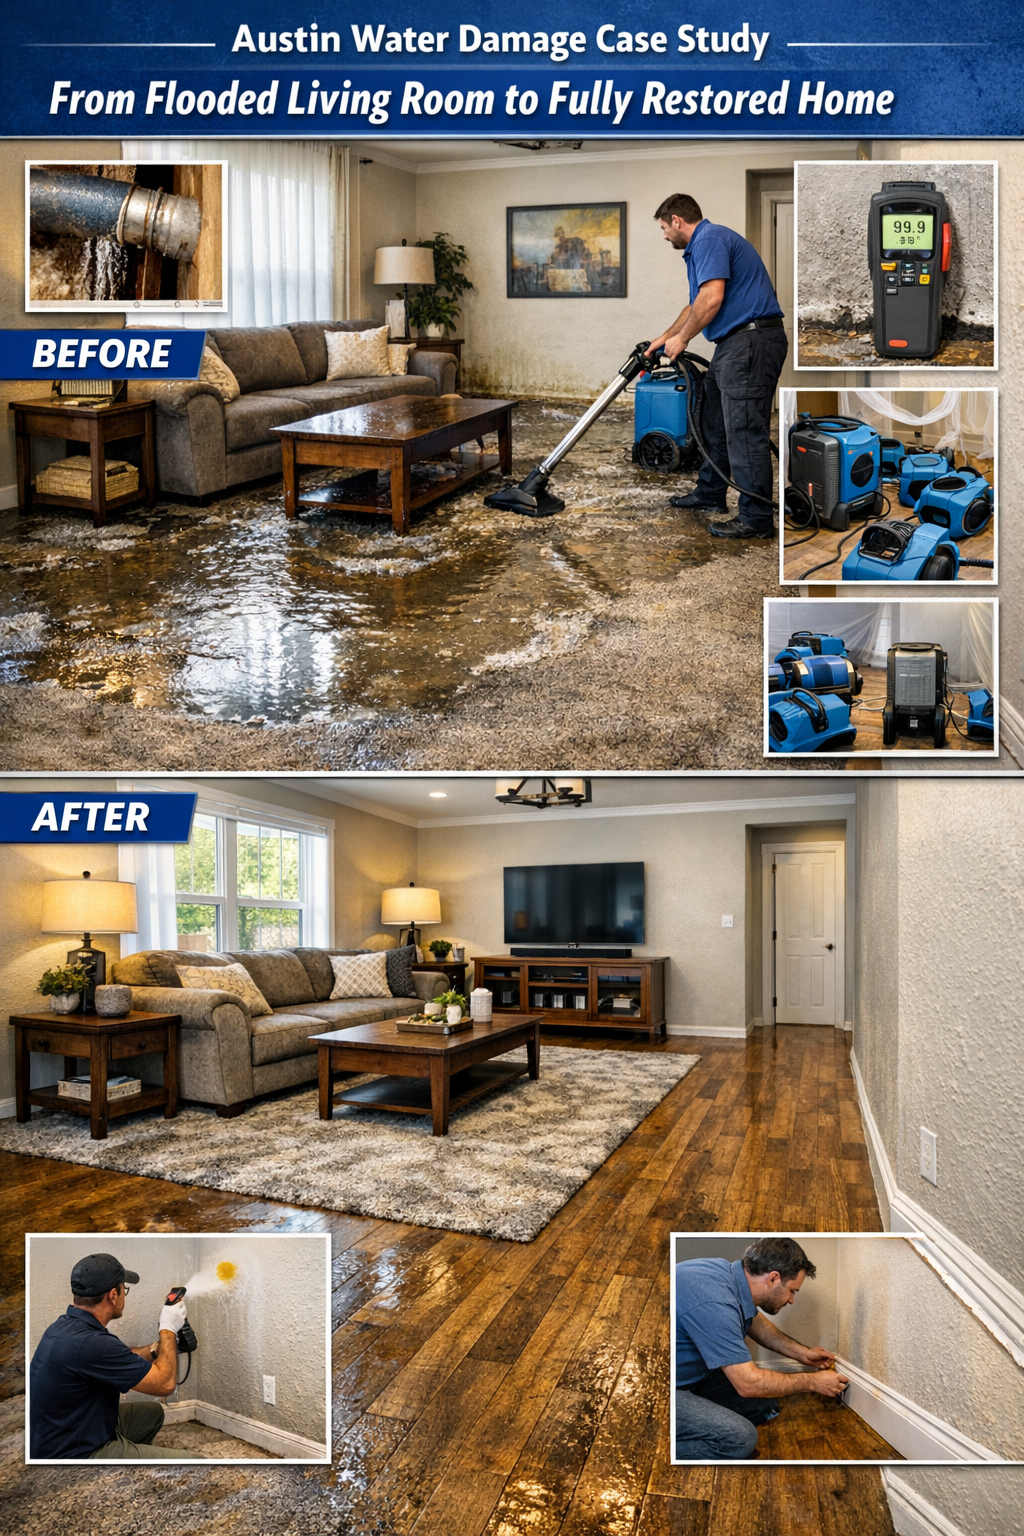
Water damage can happen suddenly and cause significant disruption for homeowners. Whether caused by a burst pipe, appliance leak, or severe storm
Read More
Explore expert tips on water damage restoration, carpet cleaning, rug cleaning, mold remediation, and air duct cleaning in Austin, TX. Trusted local insights from The Steam Team since 1983.
Water damage can happen suddenly and cause significant disruption for homeowners. Whether caused by a burst pipe, appliance leak, or severe storm
Read MoreWhen water damage occurs in a home, restoration work often begins quickly to prevent additional structural damage and mold growth.
Read MoreWater removal and restoration is the professional process of removing standing water, drying affected materials, and restoring a property to safe, usable condition; acting quickly preserves structure, limits mold growth, and reduces long-term repair costs. This guide explains what homeowners and businesses in Austin and Central Texas should expect from emergency water extraction through final reconstruction, with practical timelines and actionable steps you can use immediately. You will learn how emergency dispatch and intake work, how technicians assess and document damage, the drying and monitoring methods used to prevent mold, and how repairs and insurance coordination proceed. The Steam Team’s local response capabilities—IICRC-certified technicians, 24/7 emergency dispatch, preferred-vendor relationships with insurers, and service across Austin and Central Texas—help streamline the process when professional help is needed. After outlining each phase we provide clear checklists, equipment comparisons, and cost drivers so you can make informed decisions and reduce surprises during restoration. Read on for step-by-step expectations, what to do first, and how to work with restoration professionals and your insurer to recover efficiently.
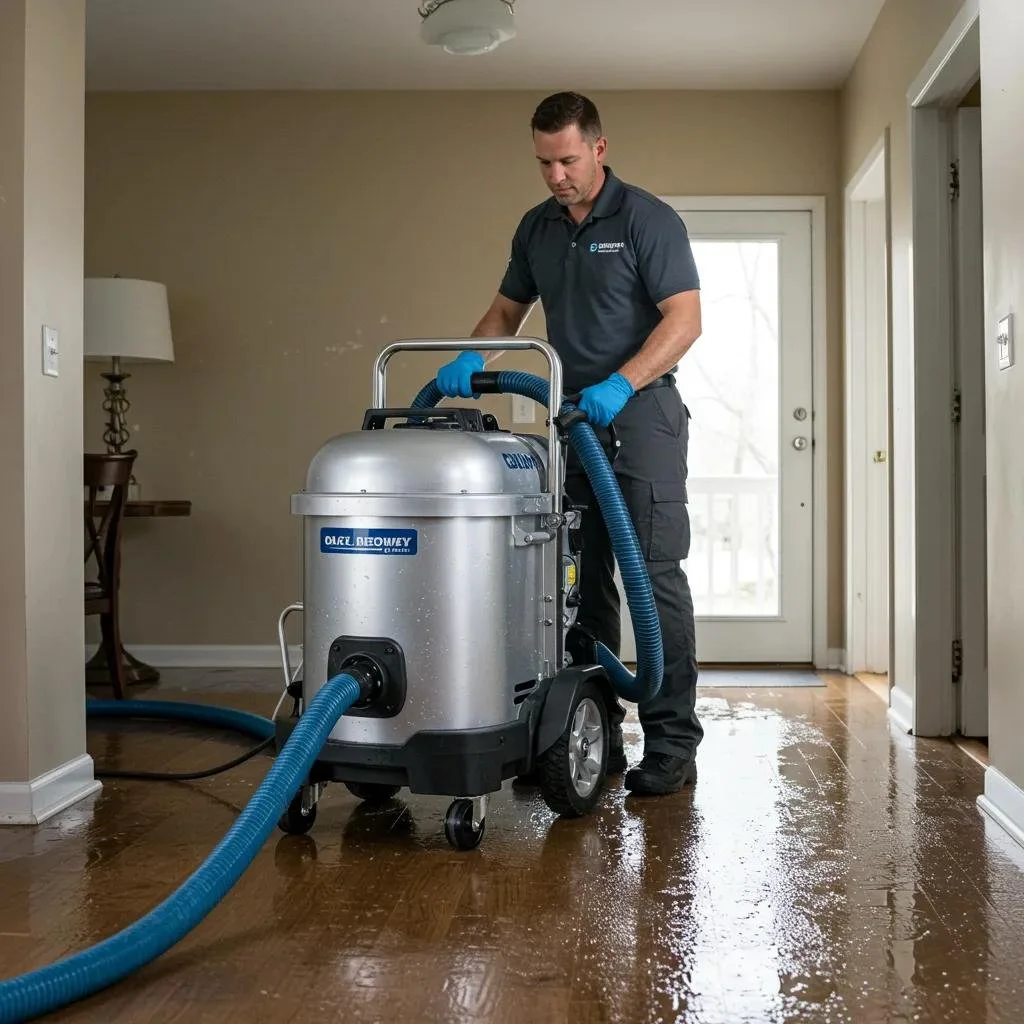
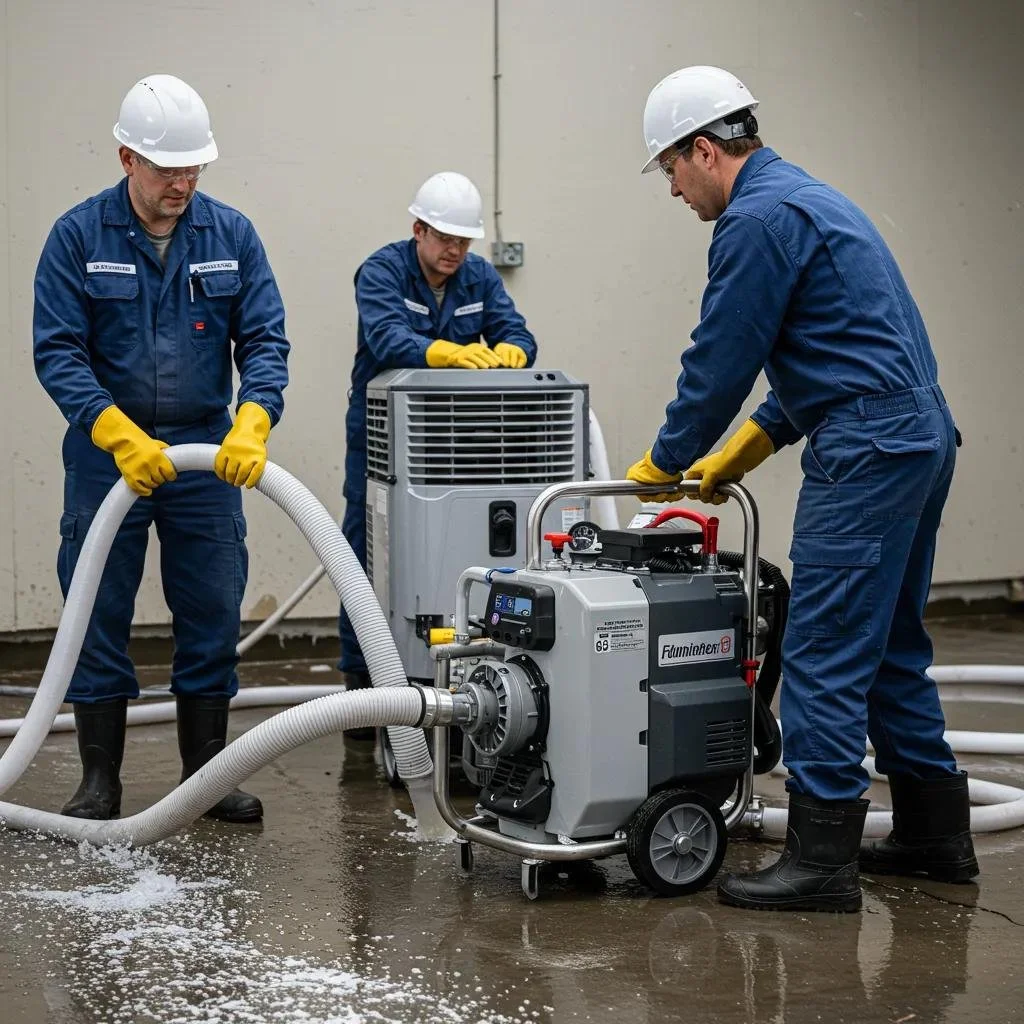
Emergency water extraction is the rapid-response sequence of call intake, onsite safety triage, bulk water removal, and immediate mitigation to stabilize a property and prevent further damage. Technicians focus first on occupant safety and hazard control, then remove standing water with high-capacity pumps and vacuums, and finally set containment and drying equipment to limit moisture migration. Rapid extraction reduces saturation of porous materials and shortens drying time, which in turn lowers mold risk and reconstruction scope. Understanding the typical steps helps homeowners act appropriately during the first hours after a leak or flood and prepares them for what crews will do when they arrive.
When you call for emergency water removal, the intake agent collects core facts: location, type of water intrusion, visible damage, and safety concerns; this information prioritizes dispatch and equipment selection. While waiting for crews, homeowners should turn off electricity if safe, move valuables to higher ground, and avoid contact with contaminated water to reduce health risks. Expect the dispatch process to include estimated arrival time, instructions for safety, and confirmation of access points, and crews typically arrive prepared to secure utilities and begin assessment. These initial actions both protect occupants and shorten the overall restoration timeline by enabling crews to start mitigation immediately.
Typical intake questions focus on location, water source, and hazards.
Immediate homeowner actions include shutting off electricity, moving possessions, and keeping pets away.
Dispatch uses the intake to decide pump types and crew size.
This quick preparation improves crew efficiency and leads directly into the initial assessment and extraction steps that follow on arrival.
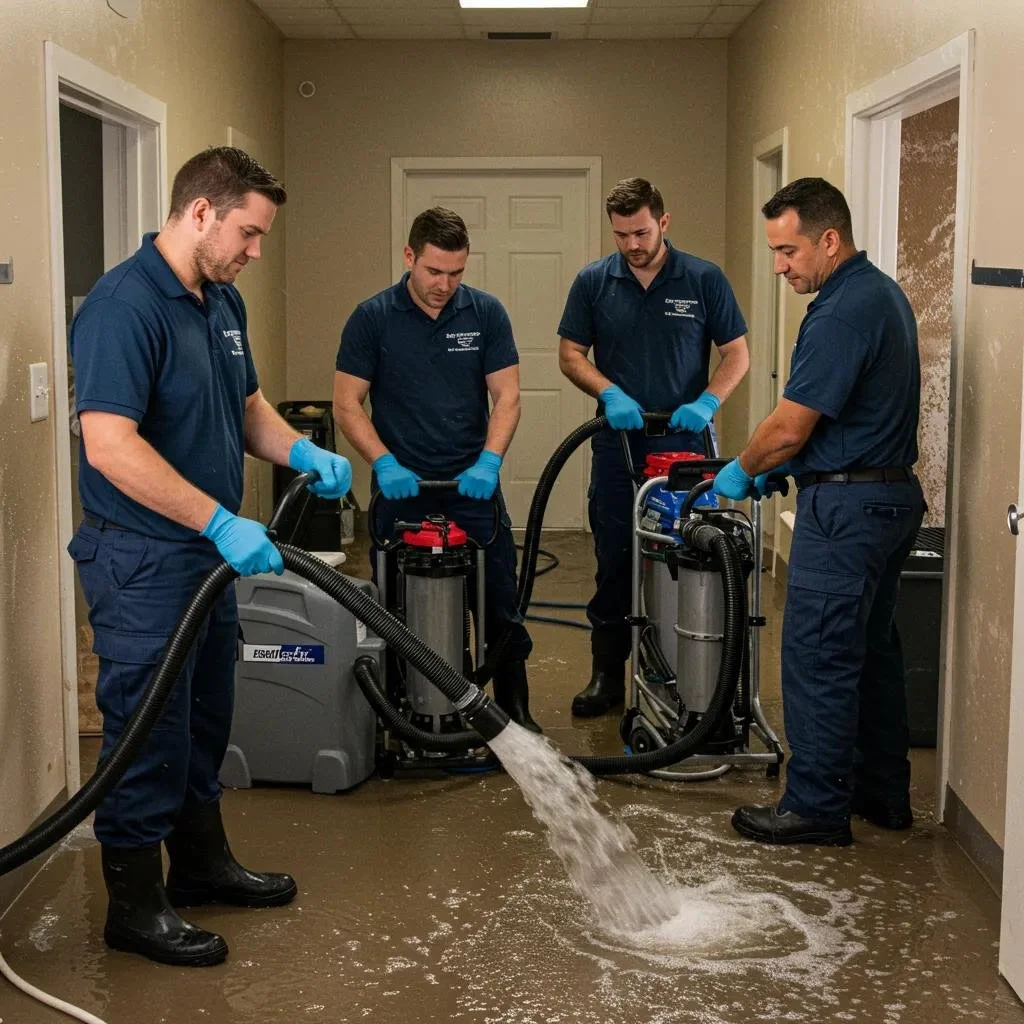
Effective extraction relies on the right pump and vacuum tools for the situation: submersible pumps handle deep standing water, truck-mounted pumps are used for high-volume floodwater, and portable wet/dry vacuums remove residual water in interior spaces. Each tool is chosen for depth, access, and contamination level; for example, submersibles excel in basements while portable vacuums allow technicians to reach corners and under cabinets. Crews also use containment barriers and sanitary measures to separate clean areas from contaminated zones, which reduces cross-contamination and speeds safe cleanup. Understanding equipment selection clarifies why some jobs require more time or heavier machinery and sets realistic expectations for homeowners.
Submersible pumps remove deep water from basements and excavations.
Truck-mounted pumps move high volumes quickly during major floods.
Portable wet/dry vacuums and extractors handle interior and finish-level removal.
These choices lead into timing expectations because the selected equipment directly affects how long extraction takes.
Extraction time varies with severity: a small pipe leak may require a few hours, a localized flooded room typically takes several hours to a day, and a basement or storm flood can take a full day or longer depending on access and volume. Variables that extend extraction time include water category (contaminated water requires careful removal), structural complexity, and safety hazards that slow entry or require remediation before water removal. Extraction is the first and often fastest visible phase, but hidden moisture and drying protocols continue after pumps are removed, so plan for multi-day monitoring and equipment presence. Recognizing these phases helps homeowners schedule insurance adjuster visits and anticipate when reconstruction planning can begin.
A thorough water damage assessment identifies the source, classifies the water, maps moisture intrusion, and defines the scope of mitigation and repairs using diagnostic tools and documentation. Technicians trace leaks, inspect structural assemblies, and classify affected materials so the drying and repair plan addresses both visible and hidden damage. Accurate assessment minimizes surprises during restoration and creates a clear scope for insurance and repair budgeting. The next subsection explains how sources and contamination levels are identified and why that classification matters for safety and remediation.
Technicians locate sources by tracing visible wet paths, checking plumbing fixtures, and inspecting roof and foundation penetrations; they also consider recent weather and drainage issues when tracing storm-related damage. Water is categorized by contamination level—clean, gray, or black—which determines protective measures and disposal methods, and this classification also affects insurance coverage and repair protocols. Safety measures differ by category: contaminated water may require full PPE, containment, and specialized disposal, while clean water focuses on structural drying. Knowing the source and category guides both immediate mitigation and the longer-term restoration decisions homeowners will face.
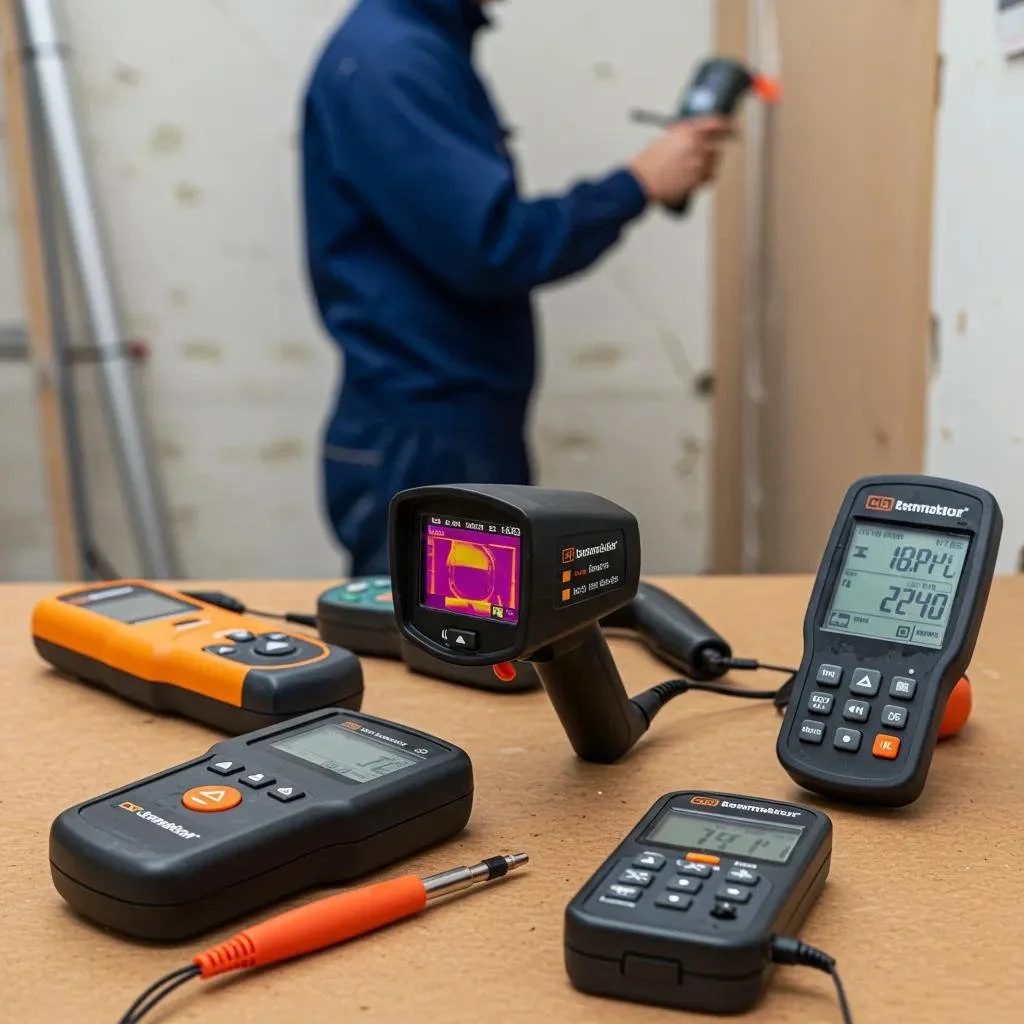
Technicians use a combination of non-invasive and invasive tools—thermal imaging cameras to reveal cold/wet zones, moisture meters for percentage readings in materials, and hygrometers to measure ambient humidity—so they can map moisture and target drying effectively. These tools produce a moisture map that informs equipment placement and drying targets, and repeated measurements document progress for homeowners and insurers. The table below compares common diagnostic tools, their measurement attribute, and typical use cases to clarify why multiple methods are often used together.
Introductory note: The table below helps homeowners understand the main inspection tools and why technicians use them in combination.
| Tool | Measurement | Typical Use |
|---|---|---|
| Thermal imaging camera | Surface temperature differences (visual heat map) | Locate hidden moisture in walls and ceilings non-invasively |
| Pin-type moisture meter | Percent moisture in wood and drywall cores | Verify material saturation and confirm drying targets |
| Hygrometer | Relative humidity and temperature | Track ambient drying conditions and dew point |
| Borescope | Visual inspection inside cavities | Inspect wall cavities without full demolition |
This comparison shows how each tool contributes unique data to create a complete moisture map that drives the drying plan and documentation for claims.
A customized plan combines inspection data, building materials, occupancy needs, and safety considerations into a prioritized mitigation and drying strategy with clear milestones. Technicians set drying goals (target moisture levels), select equipment and containment methods, and estimate timelines while documenting the scope with photos and moisture logs for homeowners and insurers. The plan is flexible: crews update equipment placement and run times based on monitoring results until drying goals are met. Clear documentation and homeowner communication during this phase reduce surprises and prepare the project for reconstruction planning once moisture targets are achieved.
Drying and dehumidification are the controlled removal of moisture from air and materials using air movers, dehumidifiers, and containment to halt deterioration and stop mold growth; the process is monitored until materials meet target dryness levels. Proper equipment balance—sufficient airflow plus appropriate moisture-extraction capacity—drives efficient drying and prevents secondary damage. Monitoring protocols establish baseline readings and frequent checks to adjust equipment and document progress. The following subsections detail equipment types, monitoring methods, and why timeliness is critical to prevent mold.
Common industrial equipment includes high-velocity air movers that increase evaporation, low-grain refrigerant (LGR) dehumidifiers that remove moisture from air efficiently in typical interiors, and desiccant dehumidifiers for low-temperature or high-moisture environments like attics or crawlspaces. Each machine has performance metrics—air movers measured in CFM, dehumidifiers in pints/day—that determine how many units a job needs for target drying. Technicians select equipment based on the moisture load, ambient conditions, and the materials affected to avoid over- or under-drying. The EAV table below summarizes typical performance ranges and applications to clarify why multiple machine types are used together.
Introductory note: This table compares common drying equipment by airflow, moisture removal rate, and optimal applications to show practical selection criteria.
| Equipment | Airflow / Capacity | Typical Application |
|---|---|---|
| Air mover | 1,200–2,800 CFM (each) | Increase evaporation across floors and walls |
| LGR dehumidifier | 50–130 pints/day | Interior spaces, basements, when temps are moderate |
| Desiccant dehumidifier | 20–200+ pints/day (effective at low temps) | Crawlspaces, attics, cold environments |
The comparison illustrates why technicians pair air movers with dehumidifiers and choose desiccants where refrigerant units are less effective.
Hidden moisture is monitored through scheduled readings using surface meters, pin meters for invasive checks, and thermal scans to validate drying progress and detect rebound pockets; technicians log values to demonstrate trend improvements. Monitoring frequency typically begins daily and then reduces as readings approach target moisture levels, with a documented acceptance threshold defined in the drying plan. This documentation assures homeowners and insurers that drying met industry standards before repair work begins, and it informs any adjustments needed to equipment or containment. Regular logs also prevent premature removal of equipment, which could allow moisture to re-equilibrate and restart deterioration.
Timely drying stops the biological process that allows mold to colonize porous materials: mold spores can begin growing within 24–48 hours on moist substrates, and prolonged high humidity accelerates spread and increases remediation complexity. Rapid evaporation and dehumidification reduce the window for mold establishment, lower health risks, and limit salvageable materials, which reduces reconstruction scope. Delayed drying typically requires mold remediation steps that increase cost and project duration, so immediate mitigation after extraction is essential. Understanding this timeline helps homeowners prioritize fast response and continuous monitoring until materials reach safe moisture levels.
Mold prevention and remediation combine accurate identification, safe containment and removal protocols, and follow-up clearance testing to restore a healthy indoor environment after water incidents. Proper remediation follows assessment results and may include targeted removal of affected materials, HEPA filtration, and containment to protect unaffected areas while preventing spore spread. Homeowners should expect clear documentation of actions and recommendations for preventing recurrence. The subsections below address detection, health considerations, and prioritized prevention measures to avoid future problems.
Mold is identified through visual inspection, moisture mapping, and targeted sampling when needed to guide remediation strategy; visual cues, musty odors, and persistent moisture readings often justify removal without sampling. Safe removal uses containment, negative air pressure with HEPA filtration, and removal or cleaning of impacted materials according to contamination level and material salvageability. Clearance testing or post-remediation verification may be performed to confirm that remediation achieved acceptable levels and moisture targets are stable. This structured approach minimizes exposure risks during removal and supports insurance documentation for both mitigation and remediation phases.
Inspection methods include visual, moisture mapping, and selective sampling when results will change the remediation scope.
Containment and HEPA filtration prevent cross-contamination during active remediation.
Clearance testing confirms success and supports insurance claims.
These steps tie directly into health considerations and longer-term prevention measures described next.
Mold exposure can cause respiratory symptoms, allergic reactions, and exacerbation of asthma in susceptible individuals, with children, the elderly, and immunocompromised people at higher risk of adverse effects. Symptoms commonly include coughing, nasal congestion, irritated eyes, and skin sensitivity; severity depends on exposure duration, individual susceptibility, and mold species. For significant exposures or vulnerable occupants, professionals recommend medical consultation in addition to remediation to address health impacts. Recognizing potential health risks informs urgency for remediation and supports decisions about temporary relocation during extensive remediation work.
Preventative measures focus on moisture control: repair the source, improve drainage, maintain indoor humidity below recommended thresholds, and ensure adequate ventilation in wet-prone areas like bathrooms and attics. Routine inspections of susceptible areas and keeping materials dry after any incident are practical steps homeowners can adopt to reduce recurrence risk. Technicians may recommend building repairs or upgrades, such as improved flashing or enhanced HVAC balancing, to eliminate chronic moisture drivers. Implementing these measures alongside a monitoring plan reduces the likelihood of future mold events and preserves indoor air quality.
Repair and restoration (reconstruction) is the phase that returns form and function to the property after mitigation and drying, encompassing repair of structural components, finish work, and a final inspection with the homeowner. Restoration begins with a documented scope informed by drying logs and inspection findings, then proceeds through material replacement or repair, finishing, and a homeowner walkthrough for acceptance. Coordinating mitigation and reconstruction teams prevents rework and ensures continuity between drying targets and final material installation. The following subsections outline common repair types, realistic timelines, and occupancy considerations during project work.
Typical repairs include drywall replacement, flooring repair or replacement, trim and cabinetry repairs, and refinishing of affected surfaces; decisions hinge on material saturation and salvageability. Technicians and contractors evaluate whether materials can be dried and cleaned in place or must be removed and replaced to ensure long-term performance and safety. Coordination with insurers and clear documentation of the scope prevent disputes and streamline approvals for replacement work. Repair choices directly affect timeline and cost, so homeowners should expect options with trade-offs explained by restoration professionals.
Full restoration timeframes vary by severity: minor repairs may conclude in a few days to a couple of weeks, moderate projects typically require several weeks, and major reconstruction can take months depending on material lead times and permit needs. Factors that extend schedules include custom materials, insurance approvals, structural repairs, and the need for specialized subcontractors. Active communication, staged scheduling, and proactive material ordering can shorten timelines where feasible. Understanding these influences helps homeowners set expectations and plan for temporary accommodations if required.
Deciding whether to remain in the home depends on the scope of work, safety concerns, and occupant comfort; limited mitigation and cosmetic repairs often allow safe occupancy, while extensive reconstruction or contamination may necessitate temporary relocation. Safety criteria include presence of contaminants, structural hazards, and continuous equipment noise or obstruction that would impact living conditions. Restoration professionals should discuss occupancy risks, mitigation to maintain livability, and coordination options including phased work to minimize displacement. Clear communication about expectations and schedules helps homeowners plan appropriately for the project duration.
Professional restoration companies can simplify insurance claims by providing timely documentation, communicating directly with adjusters where permitted, and leveraging preferred-vendor relationships to expedite approvals and coordinate scopes. The Steam Team acts as a resource for homeowners by preparing photo documentation, moisture logs, and written scopes that align with industry standards to support claims and clarify repair needs. As a preferred vendor for several insurance carriers, the company facilitates smoother communication and can often coordinate adjuster visits and technical discussions to reduce administrative delays. The next subsections explain what preferred vendor status means, how documentation is handled, and practical steps homeowners should take when filing claims.
Preferred vendor status means that insurers recognize the company's competence and processes, which can translate to more direct communication, coordinated inspections, and a faster path to scope agreement in many cases. This role does not replace homeowner responsibilities but can reduce friction by aligning documentation standards and helping to clarify technical restoration needs for adjusters. Homeowners should still report claims promptly and follow insurer instructions, while restoration professionals supply the technical documentation insurers rely upon for coverage decisions. This cooperation often shortens turnaround times and helps move projects from mitigation to reconstruction more quickly.
Documentation typically includes time-stamped photos, moisture maps, equipment logs, and an itemized scope of work that together demonstrate the cause, extent, and mitigation actions taken to protect the property. Technicians compile these materials into a clear package for the homeowner and insurer, and they may provide digital copies or structured reports that insurers accept for review. Homeowners should retain any personal documentation they created (photos, receipts) and share it with the restoration team to strengthen the claim record. Comprehensive documentation both supports settlements and reduces the need for repeated site visits by adjusters.
File a claim promptly with your insurer, document the damage with photos and notes, mitigate further damage safely, and keep receipts for emergency repairs and temporary housing if applicable; these actions protect your claim and expedite processing. Provide the insurer with the mitigation company’s documentation and remain available for adjuster coordination and questions to prevent delays. The Steam Team can assist by preparing scope estimates, moisture logs, and technician reports that align with industry standards and by coordinating with your adjuster where permission allows. Following these steps keeps the claim moving forward while ensuring restoration work proceeds with adequate documentation.
Costs for water removal and restoration depend on damage extent, water category, access complexity, and whether reconstruction is required; transparent cost drivers help homeowners estimate expenses and plan for insurance interactions. Primary cost factors include affected square footage, contamination levels, the need for specialized drying equipment, and the scope of reconstruction materials. Below is a cost-driver table that outlines common influences on price and typical value ranges to help homeowners evaluate initial estimates and understand where costs concentrate.
Introductory note: The following table summarizes common cost drivers, how strongly they influence total price, and typical ranges or impacts to guide homeowner expectations.
| Cost Driver | Influence on Price | Typical Range / Value |
|---|---|---|
| Affected area (sq ft) | Directly proportional | Small localized: low; whole-basement: high |
| Water category (clean/gray/black) | Affects PPE and disposal costs | Contaminated (black) increases cost significantly |
| Accessibility / structural complexity | Increases labor and time | Hard-to-access areas raise costs by 10–50%+ |
| Reconstruction needs | Material and finish replacement | Cosmetic repairs add moderate cost; structural repairs add high cost |
Pricing is influenced by the size of the affected area, the water category, the ease of access for equipment, and whether contents require pack-out and specialized cleaning; contaminated water and structural issues raise both mitigation and disposal costs. Labor intensity and required equipment hours (pumps, dehumidifiers, air movers) also affect hourly and daily charges, while reconstruction materials and finishes determine final repair costs. Insurance coverage nuances and the need for permits or subcontractors may add to timelines and cost. Understanding these drivers helps homeowners compare estimates and ask targeted questions about equipment, documentation, and reconstruction assumptions.
Homeowners can estimate costs using per-square-foot ranges for basic mitigation, adjusting for contamination, accessibility, and reconstruction needs, or request a professional on-site estimate for the most accurate scope. Sample approaches include asking contractors for itemized scopes with per-item pricing, using moisture logs to verify extent, and comparing two or more detailed estimates to identify scope differences. A professional estimate that includes equipment hours, monitoring cadence, and reconstruction line items gives the clearest picture for insurance and budgeting decisions. Accurate scopes also reduce the risk of change orders that can increase final costs.
Homeowners can reduce expenses by acting quickly to mitigate damage, documenting the incident thoroughly for insurers, salvaging reusable contents promptly, and coordinating with restoration professionals who provide clear, itemized scopes to avoid unnecessary work. Immediate safe actions—moving valuables, shutting off utilities where appropriate, and preventing traffic through wet areas—limit additional damage and material replacement needs. Working with a restoration company that provides detailed moisture logs and efficient equipment placement can shorten drying time and reduce rental or equipment charges. If you need assistance or a written estimate, contact The Steam Team by phone at 512-451-8326 or arrange a local appointment at their Austin office at 9901 Burnet Road to request a quote or schedule emergency service; technicians can explain expected next steps and documentation you will receive.
Immediate mitigation reduces overall restoration scope and cost.
Detailed documentation and clear scopes prevent unexpected change orders.
Professional coordination with insurers can streamline approvals and limit delays.
These measures help balance safety, effectiveness, and cost control while restoring your property to a safe, habitable condition.
After a water damage incident, prioritize safety by turning off electricity if it's safe to do so and moving valuables to higher ground. Avoid contact with contaminated water to reduce health risks. Document the damage with photos and notes for insurance purposes. If possible, start the mitigation process by removing excess water with mops or towels, but avoid using electrical appliances in wet areas. Prompt action can significantly reduce the extent of damage and the overall restoration timeline.
Preventing future water damage involves regular maintenance and inspections. Ensure that your roof, gutters, and downspouts are in good condition to direct water away from your home. Check plumbing for leaks and repair any issues promptly. Install sump pumps in basements and consider waterproofing your foundation. Additionally, maintain indoor humidity levels below 60% and ensure proper ventilation in moisture-prone areas like bathrooms and kitchens. These proactive measures can help mitigate the risk of future incidents.
Signs of hidden water damage can include unexplained increases in utility bills, water stains on walls or ceilings, peeling paint or wallpaper, and a musty odor in certain areas. You may also notice mold growth or warped flooring. If you suspect hidden water damage, it’s crucial to conduct a thorough inspection or hire a professional to assess the situation. Early detection can prevent more extensive damage and costly repairs down the line.
Insurance coverage for water damage claims varies based on the policy and the cause of the damage. Most homeowners' insurance policies cover sudden and accidental water damage, such as from burst pipes, but may exclude damage from flooding or lack of maintenance. It's essential to review your policy details and understand your coverage limits. When filing a claim, provide thorough documentation, including photos and repair estimates, to support your case and expedite the claims process.
Water is categorized into three types based on contamination levels. Clean water comes from a clean source, such as a broken pipe, and poses minimal health risks. Gray water contains some contaminants, often from sinks or washing machines, and can cause discomfort if ingested. Black water is highly contaminated, typically from sewage or floodwaters, and poses significant health risks. Understanding these categories is crucial for determining the appropriate response and safety measures during water removal and restoration.
Choosing a reliable water damage restoration company involves researching their credentials, experience, and customer reviews. Look for companies that are IICRC-certified, as this indicates they adhere to industry standards. Ask for references and check online ratings. Additionally, ensure they offer 24/7 emergency services and have a clear process for working with insurance claims. A reputable company will provide a detailed estimate and communicate openly about the restoration process, timelines, and costs involved.
During the reconstruction phase, you can expect a thorough assessment of the damage and a detailed plan for repairs. This may include replacing drywall, flooring, and other structural components. The restoration team will coordinate with you to ensure that the work aligns with your needs and preferences. Expect clear communication regarding timelines, costs, and any necessary permits. A final walkthrough will typically occur to ensure your satisfaction with the completed work before the project is officially closed.
Understanding the comprehensive water removal and restoration process empowers homeowners to make informed decisions that protect their property and health. By acting swiftly and coordinating with professionals, you can minimize damage, reduce costs, and ensure a safe living environment. Explore our services to find the right solutions tailored to your needs and experience peace of mind during restoration. Contact The Steam Team today to learn more about how we can assist you in your recovery journey.
Water damage happens fast and the consequences compound faster: standing moisture, damaged materials, and mold can begin to develop within 24–48 hours, making immediate, informed action essential for limiting loss and long-term costs. This guide explains step-by-step what to do the moment you discover water intrusion, how different water types affect safety and cleanup, and what professional restoration involves so you can prioritize human safety, preserve evidence for insurance, and reduce structural damage. You will learn how to triage risks, safely stop water and electrical hazards, document damage for claims, and what to expect from a professional restoration workflow including extraction, drying, sanitizing, and reconstruction. Practical checklists and short how-to lists are included for the first 1–48 hours, plus concise explanations of mold timelines and insurance documentation that are designed to be clear for homeowners and small-business owners in Austin and Central Texas. After the immediate steps and technical background, the guide describes how working with a preferred vendor and certified technicians can simplify claims and speed repairs, and it finishes with trusted contact options for urgent response.
Water is classified into categories that determine contamination risk and cleanup requirements; understanding these categories helps you choose the right safety precautions and remediation approach. Category 1 water is clean and comes from a sanitary source, Category 2 (gray water) contains contamination and chemicals, and Category 3 (black water) is grossly contaminated by sewage, floodwater, or hazardous runoff. Each category raises different health and structural concerns—Category 1 may allow limited DIY mitigation, while Category 3 usually requires full professional remediation and containment to protect occupants. Recognizing the category quickly guides PPE selection, disposal decisions for porous materials, and whether to call emergency services or remediation specialists.
Category 1 is clear, potable water from sources such as a supply line or appliance overflow and typically poses the lowest immediate health risk, but it can become contaminated if left untreated. Category 2, or gray water, includes wastewater from appliances, dishwashers, or washing machines and contains chemicals or biological matter that can cause illness and requires more aggressive cleanup and disinfection. Category 3, or black water, includes sewage, storm floodwater, or standing water that has been stagnant and is unsafe to handle without full protective gear and professional protocols. Knowing the category informs whether you can use household cleaners and fans or must rely on certified remediation teams to remove contaminated materials and perform sanitization.
The water category drives PPE, cleaning agents, and disposal rules: clean water may require gloves and rapid drying, gray water needs antimicrobial cleaning and discarding of some porous items, while black water requires full PPE, controlled removal, and specialized waste handling. For porous materials like drywall, insulation, and carpeting exposed to Category 2 or 3 water, removal is often necessary because contaminants can penetrate beyond surface cleaning. Containment procedures—such as sealing off affected rooms and using negative pressure during remediation—reduce cross-contamination and protect unaffected areas. Understanding these distinctions helps you assess immediate risks and decide whether to perform limited mitigation actions or to wait for professional containment and removal.
Immediately after discovering water damage, prioritize life-safety, then stop the source if safe, reduce further water spread, and document the scene for insurance—acting quickly within the first 24–48 hours materially reduces mold risk and repair costs. Start by ensuring everyone is safe, moving people and pets away from standing water and wet electrical sources, then consider shutting off water and power only if it can be done without exposing anyone to live electrical hazards. Document the damage with time-stamped photos and video before moving items; this record supports insurance claims and helps technicians scope work accurately. Limited DIY mitigation—like removing small rugs, elevating furniture, or using towels to limit spread—can be helpful but avoid any extraction or cleanup of contaminated water and never enter areas with standing water if electricity might be live.
Turn off electricity and stop the water source if it is safe to do so, prioritizing human safety and keeping clear of standing water that may contact live circuits.
Document the damage with photos and video, making sure to capture timestamps, room-by-room overviews, and close-ups of affected belongings and structural elements.
Remove or elevate undamaged valuables and move pets and people to dry areas; avoid handling contaminated materials and seal them off for professionals to evaluate.
These immediate steps prevent additional damage and preserve evidence for insurance, and they also prepare the property for faster professional mitigation once technicians arrive.
Shutting off electricity and stopping the water source are high-priority safety actions, but they carry risk—always avoid touching electrical panels while standing in water and call professionals if you suspect live circuits are exposed. Locate the main water shutoff (often near the meter, in a utility area, or near the street-facing wall) and turn it off to stop inflow; if in doubt, contact a plumber or emergency responder to avoid making the situation worse. For electrical shutoff, move people away from wet areas and, if safe and dry, flip the main breaker; otherwise wait for a qualified electrician or remediation team. If you cannot safely access shutoffs or find electrical arcing, leave the area and contact emergency services and a professional restoration provider for immediate support.
Documenting damage thoroughly and prioritizing movable valuables reduces loss and simplifies claims—start with wide-angle photos, then close-ups and videos showing timestamps and any identifying serial numbers or paperwork. Place salvageable small items in dry plastic bins or elevated surfaces, and avoid wiping or drying items that may have forensic value for claims; make a simple inventory list that notes condition and location. For high-value items, photograph both front and back and keep receipts or appraisals handy for insurers; secure items in a dry, climate-controlled area if possible. Clear documentation and careful handling maintain chain-of-evidence for adjusters and speed decision-making during mitigation.
Limited DIY attention is appropriate for small, clean-water incidents: blotting, mopping, and using household fans for surface evaporation can reduce short-term damage, but these actions must be time-limited and focused on preventing spread rather than full restoration. Avoid attempting large-scale extraction, carpet removal, or cleaning of contaminated water (Category 2/3), which require commercial pumps, dehumidifiers, and certified technicians to handle disposal and sanitization. Preserve evidence for your insurer by photographing wet areas before extensive DIY work and keep receipts for any temporary mitigation supplies purchased. If conditions suggest contamination or structural compromise, pause DIY efforts and wait for professional assessment and mitigation.
Professional restoration follows a systematic, five-step process—contact and triage, extraction, drying and dehumidification, cleaning/sanitizing, and reconstruction—to restore safety and habitability while preventing secondary damage such as mold. The initial contact gathers triage information (water source, category, affected areas) to determine rapid response needs and equipment staging, and on-site assessment establishes scope and a mitigation plan. Extraction uses industry-grade pumps and vacuums to remove standing water quickly; drying employs air movers and industrial dehumidifiers while monitoring moisture metrics to verify progress. Cleaning and sanitizing remove contaminants and odors according to water category, and final reconstruction repairs or replaces damaged structural elements, coordinating with insurers and other trades as needed.
When you place an emergency call, intake staff collect vital details—location, access, source of water, and any immediate safety concerns—to prioritize response and dispatch technicians with appropriate equipment. On arrival, technicians conduct a moisture mapping and structural assessment using moisture meters and infrared imaging where needed, documenting findings and creating an initial scope of work with mitigation priorities. Immediate mitigation steps such as containment, temporary tarping, and prioritized extraction may occur to stabilize conditions before a full scope is agreed upon. This rapid assessment reduces uncertainty for homeowners and establishes a clear path to drying and restoration, which in turn helps with insurance documentation and scheduling.
Extraction equipment selection depends on the volume and contamination of water; effective extraction reduces drying time and lowers repair costs by removing bulk water before dehumidification begins. Below is a comparison of common extraction tools, their attributes, and typical uses to clarify selection criteria during mitigation.
| Extraction Tool | Key Attribute | Typical Use Case |
| Submersible Pump | High flow rate for deep standing water | Best for basements or large-volume intrusions where rapid bulk removal is required |
| Wet/Dry Vacuum | Portable, versatile suction for low-to-moderate water | Useful for small rooms, surface water, and controlled indoor spaces |
| Truck-Mounted Pump | Large capacity and continuous operation | Ideal for major floods and commercial jobs with significant volume and logistics |
These extraction options are part of a professional toolkit; technicians choose based on water depth, contamination level, and structural constraints to maximize removal speed and safety.
Drying couples directed airflow from air movers with dehumidification to remove both free water and moisture from building materials; professionals monitor progress using hygrometers and moisture meters to hit validated targets. Industrial dehumidifiers—often low-grain refrigerant (LGR) units—reduce relative humidity and support evaporation, while air movers speed surface moisture removal and prevent stratification. Technicians set target relative humidity and moisture content levels and perform daily readings to adjust equipment placement and runtime until readings indicate dryness. This measured approach minimizes the risk of mold proliferation and verifies when reconstruction can safely begin, ensuring remediation meets industry standards.
Preventing mold centers on rapid drying, controlling humidity, and removing contaminated porous materials; because mold can begin within 24–48 hours, speed and appropriate technique determine success. The core prevention strategies are drying to safe moisture levels, using dehumidification to maintain relative humidity below target thresholds, and cleaning or removing materials that retain moisture or are contaminated. Early detection—watching for musty odors, staining, or visible growth—triggers targeted remediation or testing. When professional remediation is required, containment and HEPA filtration are commonly used to remove spores and prevent cross-contamination during removal of affected materials.
| Drying/Prevention Action | Typical Time-to-Complete | Effectiveness / Notes |
| Drying (air movers + monitoring) | 24–72+ hours depending on volume | Highly effective when paired with dehumidification and daily moisture readings |
| Dehumidification (LGR units) | Continuous during drying period | Keeps RH below recommended target (40–50%), critical for preventing mold growth |
| Cleaning/Sanitizing (antimicrobials) | 1–2 days for accessible surfaces | Required for Category 2/3 contamination; porous materials may still need removal |
These comparisons show that combining drying with professional dehumidification and appropriate cleaning gives the best chance to prevent mold; when contamination is significant, removal of affected materials remains the most reliable option.
Early mold signs include visible discoloration or fuzzy growth on surfaces, persistent musty odors, and ongoing dampness or condensation despite drying efforts; occupants may also notice increased allergy-like symptoms or respiratory irritation. Visual inspection of hidden areas—behind baseboards, under carpets, and in wall cavities—helps detect early growth, while moisture mapping can reveal pockets of trapped moisture that promote mold. If you observe these signs or if drying isn’t progressing toward target metrics, professional testing or remediation is warranted to quantify the issue and plan containment. Early detection and decisive action limit both health impacts and restoration costs, restoring a safer indoor environment more quickly.
Effective remediation begins with containment to isolate affected zones and prevent spore migration, followed by removal of contaminated porous materials, HEPA vacuuming, and targeted antimicrobial application where appropriate. HEPA-filtered air scrubbers and negative-pressure setups remove airborne spores during remediation, while physical removal of drywall, insulation, and carpeting eliminates reservoirs for regrowth. For non-porous surfaces, professional cleaning with EPA-registered antimicrobial agents combined with mechanical agitation removes residual contamination. Certified remediators follow documented protocols for clearance testing and verify moisture targets before reconstruction, ensuring the area is safe for reoccupation.
Drying reduces moisture content in materials, while ventilation exchanges humid indoor air with drier outside air; together they lower relative humidity to levels that inhibit fungal growth. Aim for target indoor relative humidity in the 40–50% range during remediation and ensure continuous monitoring until readings stabilize at or below targets. Simple ventilation—opening windows when outdoor conditions permit—can assist initially, but professional dehumidification is necessary for sustained control in humid climates or serious water events. When natural ventilation is insufficient, industrial dehumidifiers and strategically placed air movers deliver the controlled environment required to prevent mold proliferation and support safe reconstruction.
Insurance claims for water damage hinge on timely documentation, mitigation, and clear communication with adjusters; following a structured process reduces delays and improves claim outcomes. Document the incident with photos, videos, and estimates; keep receipts for temporary mitigation expenses and any emergency services used. Adjusters evaluate damage, verify coverage, and authorize scopes of work; prompt mitigation can reduce the overall cost and complexity of claims by limiting secondary damage. Choosing a restoration provider that works with insurers and understands claim workflows can streamline approvals and scheduling, reducing friction during a stressful recovery period.
Insurers typically expect photo and video evidence with timestamps, a room-by-room inventory of damaged items, receipts for emergency mitigation and temporary repairs, and contractor estimates or scopes of work to support the claim’s cost basis. Documentation should demonstrate cause, timing, and the steps taken to mitigate further damage; include photos of shutoffs or point-of-origin evidence when available. Keep copies of correspondence and the mitigation provider’s daily logs or equipment readings if available, as these help justify the necessity and timing of interventions. Accurate, chronological documentation accelerates adjuster review and helps prevent disputes over the scope of covered work.
| Document Type | Why It's Needed | Example / Notes |
| Photos & Video | Establish extent and timing of damage | Wide shots + close-ups with timestamps |
| Receipts & Mitigation Logs | Verify emergency actions and expenses | Receipts for pumps, fans, or temporary repairs |
| Contractor Estimates | Support scope and cost justification | Written estimate outlining extraction, drying, and repair phases |
Why It's Needed
Example / Notes
Photos & Video
Establish extent and timing of damage
Wide shots + close-ups with timestamps
Receipts & Mitigation Logs
Verify emergency actions and expenses
Receipts for pumps, fans, or temporary repairs
Contractor Estimates
Support scope and cost justification
Written estimate outlining extraction, drying, and repair phases
This checklist clarifies focus areas when preparing a claim and helps homeowners present a complete record that insurers can review quickly.
Adjusters verify losses and determine coverage, and when restoration professionals coordinate directly with adjusters they can expedite scope approvals and reduce back-and-forth for documentation. Detailed mitigation reports, daily monitoring logs, and moisture readings allow adjusters to see objective progress and justify approved work. Providers who are familiar with common carrier requirements can present organized documentation that mirrors insurer expectations, making approvals faster and reducing scheduling delays. Clear communication and access to professional estimates also helps homeowners understand any deductibles or coverage limitations, letting restoration work proceed with minimal administrative hold-ups.
As a preferred vendor for top insurance carriers in Texas, The Steam Team can assist homeowners by coordinating with adjusters and helping streamline scheduling and scope approvals during the claims process. Preferred-vendor relationships often translate into more predictable communication paths and faster authorization for mitigation and reconstruction work, reducing elapsed time between claim filing and actual repairs. When you engage a preferred provider, they can offer direct documentation support—such as mitigation logs and moisture readings—that insurers commonly require, which lowers friction in approvals. If you prefer assistance with a claims consultation, contacting a restoration partner experienced with insurance workflows can simplify next steps and keep restoration moving efficiently.
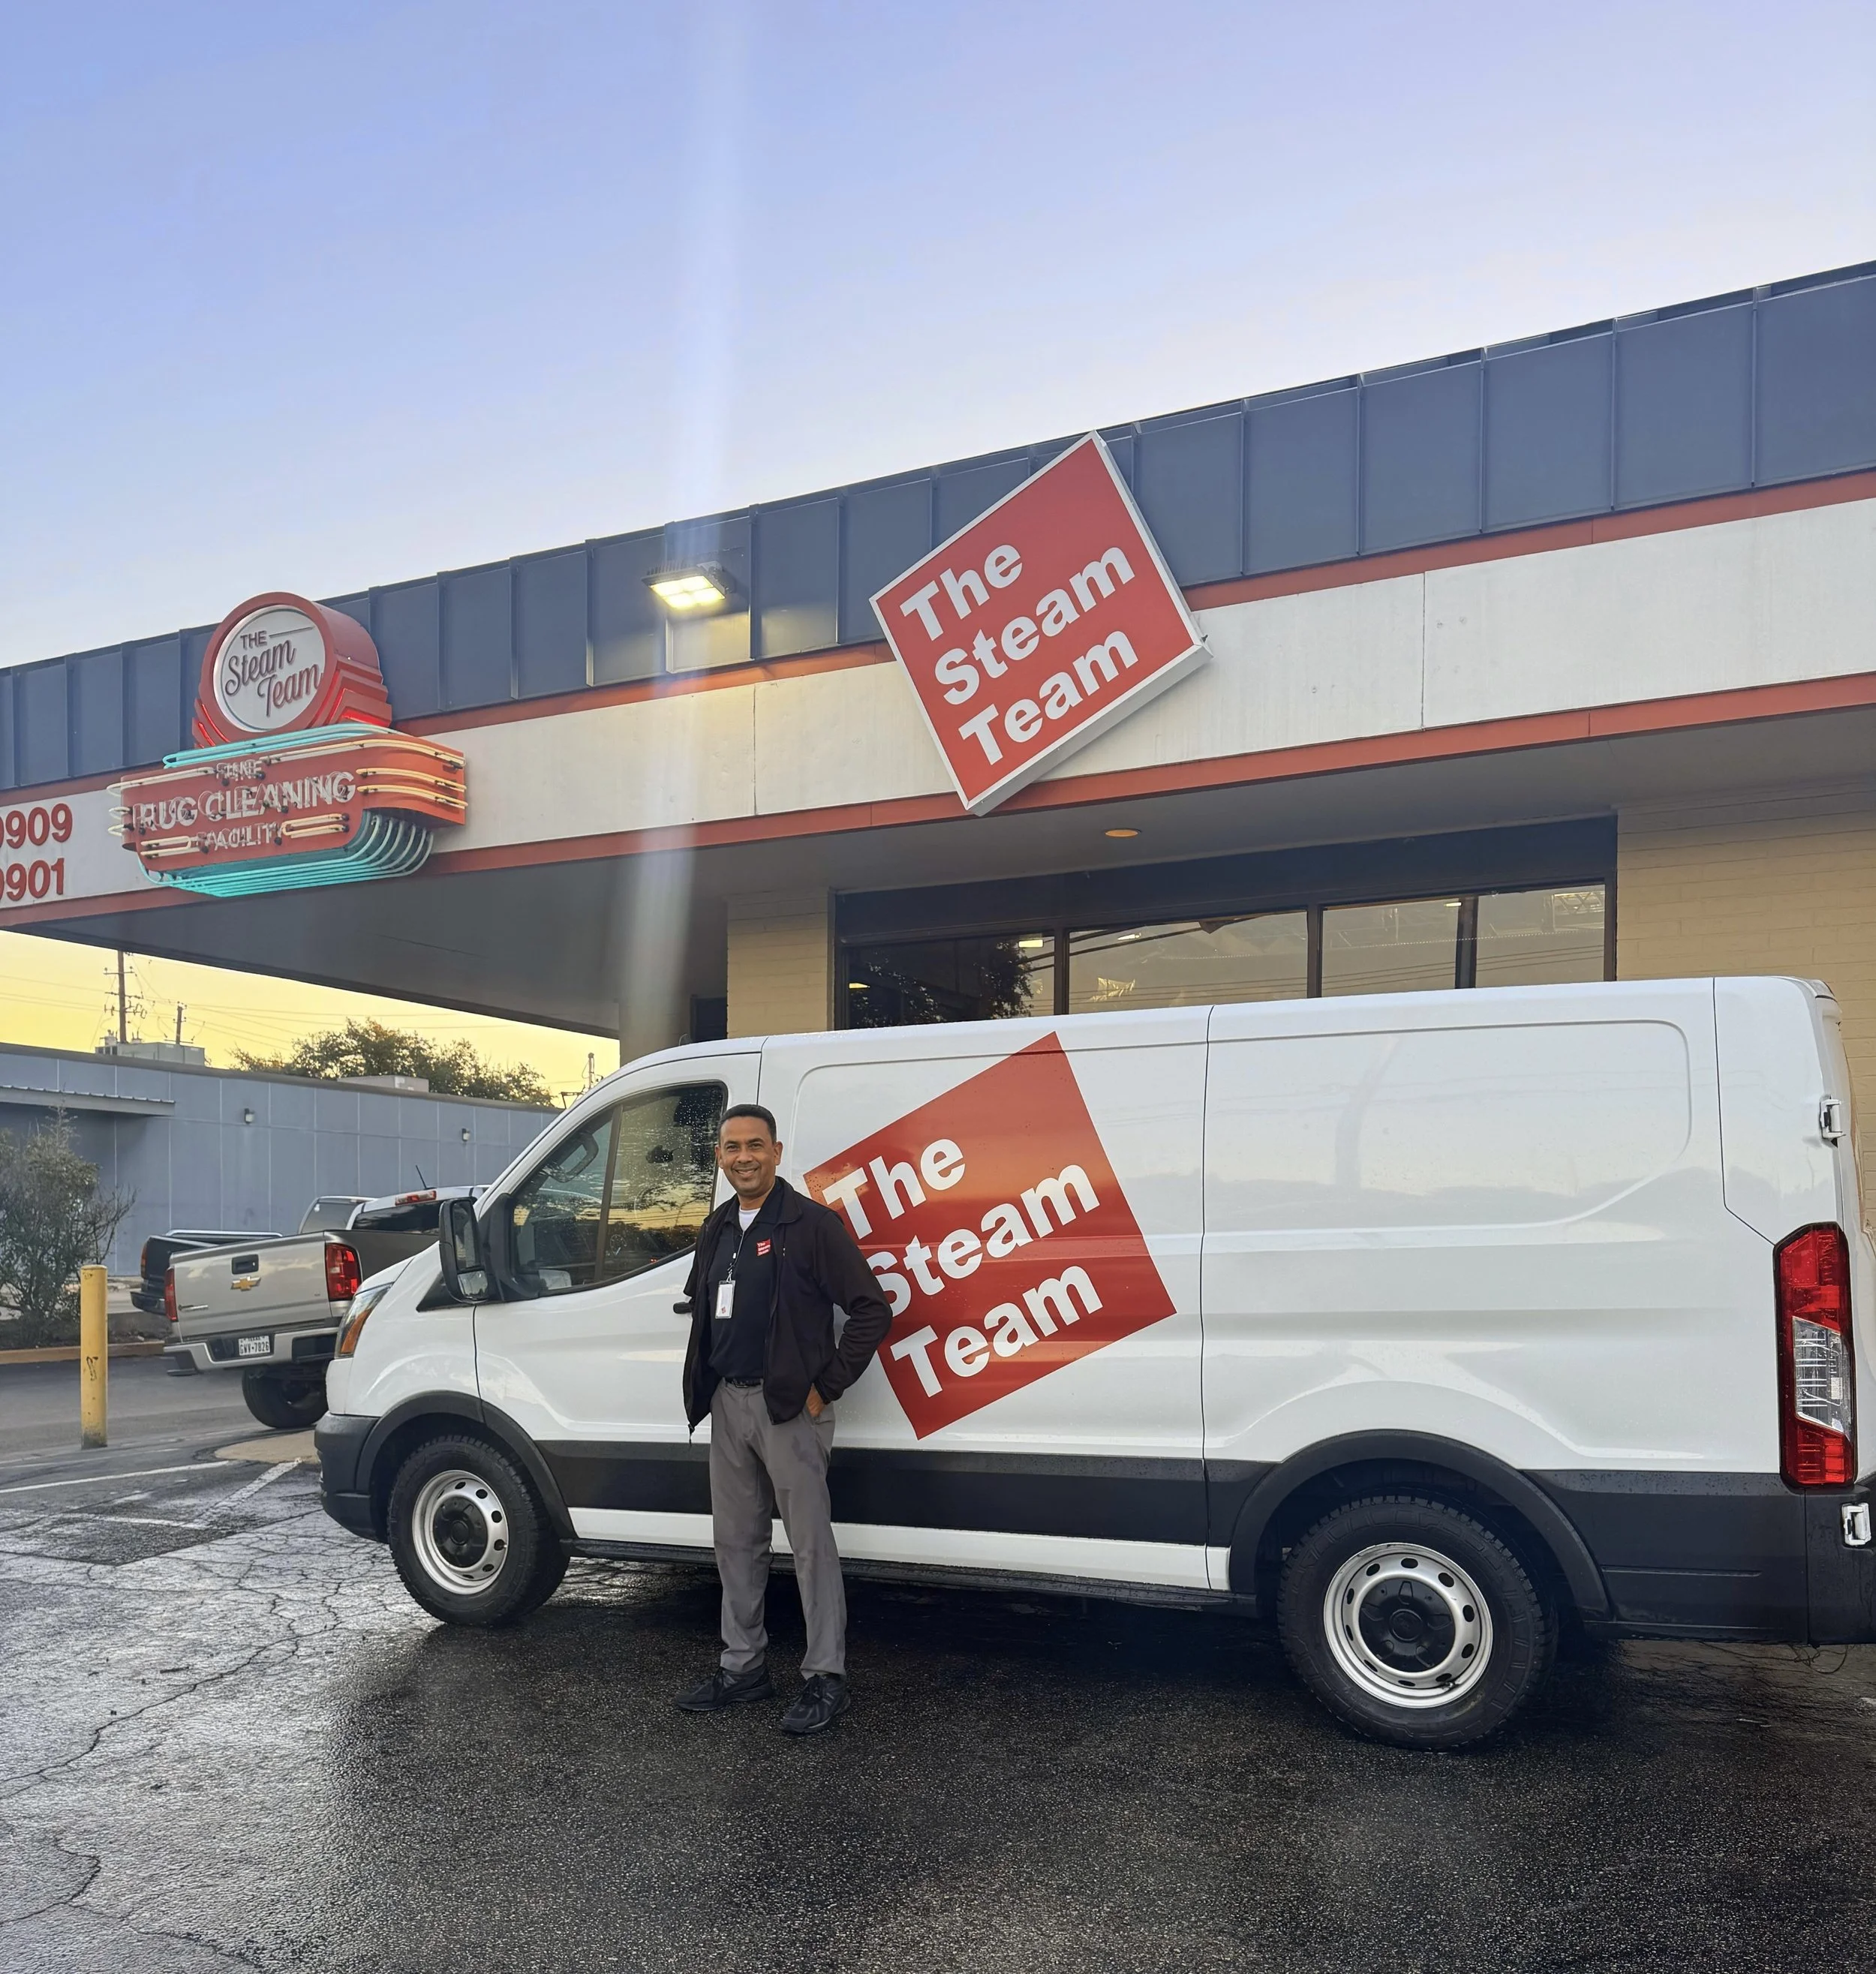
For urgent water events in Austin and Central Texas, selecting a local restoration partner with emergency response capability and certified technicians helps accelerate mitigation and protect your property from secondary damage. The Steam Team provides 24/7 emergency response and positions trained technicians quickly to perform assessment, extraction, and drying while documenting work for insurance. Their team includes technicians trained to industry standards, and the company’s standing as a preferred vendor for insurers helps coordinate claims and scheduling for customers. Local recognition and quality assurances create trust that the response will be fast, documented, and aligned with professional standards—helping homeowners return to normal sooner.
The Steam Team maintains a 24/7 emergency intake and dispatch protocol designed to triage calls, prioritize life-safety issues, and mobilize technicians with appropriate equipment for immediate mitigation. Call intake gathers source, category, and access details so the on-site crew arrives prepared with pumps, dehumidifiers, and containment supplies, enabling faster stabilization of the property. Rapid arrival and documented initial mitigation—such as temporary water shutoff support, bulk extraction, and containment—reduce the window for mold growth and structural damage. This predictable emergency workflow keeps homeowners informed and provides documented action logs that support timely insurance processing.
Certified technicians apply industry-standard methods—such as moisture mapping, controlled drying, and documented clearance checks—to ensure restoration meets established safety and performance criteria. Certifications indicate formal training in techniques for structural drying, microbial control, and equipment operation, which translates into faster, safer remediation and more reliable restoration outcomes. Quality assurance steps include daily monitoring reports, moisture verification before reconstruction, and final walkthroughs to confirm the work meets both technical and homeowner expectations. These systematic practices reduce the likelihood of missed pockets of moisture and help ensure restoration decisions are evidence-based and verifiable.
Local recognition and accreditation signal a provider’s commitment to professional standards and customer service; The Steam Team’s credentials and local awards provide added assurance for homeowners selecting a restoration partner. Accreditations and positive community recognition support confidence in response capabilities and technical competence, while customer-focused guarantees define expectations for workmanship and follow-up. These assurances, combined with documented processes and clear communication during emergency response, help homeowners feel secure that remediation will be thorough and that the vendor will work constructively with insurers and contractors. Choosing a trusted local partner reduces uncertainty during the critical initial recovery phase.
People often ask about timelines, DIY viability, costs, drying methods, and future prevention; clear, concise answers help set expectations and encourage the right next steps for safety and claims. Restoration timelines depend on severity—mitigation may take 1–7 days while full reconstruction can extend to weeks—so early action shortens the overall schedule. DIY is appropriate for small, clean-water incidents but not for contaminated events or structural damage. Costs vary with scope and coverage; fast mitigation reduces total expense. Safe drying relies on correct equipment, monitoring, and humidity control to prevent mold and structural issues.
Mitigation—removing standing water, setting up drying equipment, and stabilizing the structure—commonly completes within 1–7 days for residential incidents, while full reconstruction may take several weeks depending on material replacement and permit timelines. Drying time varies with building materials, volume of water, the extent of saturation, and ambient humidity; wood framing and heavy insulation can extend timelines. Rapid initial extraction reduces drying time, and documented moisture targets guide when reconstruction begins safely. Realistic expectations and ongoing communication with your restoration provider keep scheduling predictable and transparent.
Small-scale clean-water spills may be manageable with towels, mops, and household fans, but any significant intrusion, contaminated water, or structural involvement requires professional remediation to address hidden moisture and health risks. Red flags that require professionals include standing water deeper than a few inches, water from outdoors or sewage, soaked structural elements, or any sign of contamination. Improper DIY efforts can trap moisture and increase mold risk, and they may complicate insurance claims if mitigation is not documented. When in doubt, perform minimal temporary mitigation, document the scene, and call a qualified restoration provider.
Costs depend on severity, materials impacted, the water category, and whether reconstruction is required; early mitigation typically reduces overall expense by avoiding extensive demolition and mold remediation. Rather than providing a generic price, restoration professionals assess the scope and provide written estimates based on extraction needs, drying duration, and reconstruction work. Insurance coverage and deductibles influence out-of-pocket costs, and meticulous documentation of mitigation actions helps substantiate claims. Prompt action to remove water and begin drying is the most reliable way to manage costs and limit long-term damage.
Safe drying begins with rapid removal of standing water, followed by strategically placed air movers and commercial dehumidifiers while monitoring moisture content daily until target levels are reached. Target indoor relative humidity during remediation is generally in the 40–50% range; technicians use hygrometers and moisture meters to verify progress and adjust equipment placement as needed. Avoid using only household fans in large or contaminated events; professional equipment provides higher airflow and continuous dehumidification to prevent re-saturation. Final verification of dryness before reconstruction prevents hidden moisture pockets and reduces mold risk.
Regular maintenance and preparedness reduce the likelihood and impact of future water events: inspect and clear gutters, test sump pumps, insulate vulnerable pipes, and maintain appliance hoses and seals to catch failures early. Seasonal checks—before heavy rains or freezes—help identify weak points in drainage and plumbing that could lead to intrusion. Install water alarms in basements and near high-risk appliances to gain early notice of leaks, and consider routine professional inspections for commercial properties to detect slow leaks or drainage problems. Proactive maintenance and early detection minimize the chance of catastrophic water events and limit the scope of future repairs.
Maintain drainage and gutters: Clean debris and ensure downspouts direct water away from the foundation.
Inspect plumbing and appliances: Check hoses, seals, and visible pipes for wear and leaks.
Install alarms and backups: Use water detection alarms and maintain sump pump backups where applicable.
These preventive actions reduce the frequency and severity of water incidents and simplify recovery should an event occur, connecting preparedness to lower repair costs and shorter restoration timelines.
If you face an active water emergency or need a mitigation assessment, contact a local emergency restoration provider with 24/7 response and insurance coordination experience to reduce damage and begin documented mitigation immediately. For urgent response in Austin and Central Texas, The Steam Team offers round-the-clock emergency dispatch, certified technicians, and preferred-vendor coordination with insurance carriers to help streamline claims and repairs. When calling for help, be prepared to describe the source, water category if known, and any immediate safety concerns so the response team can arrive equipped for efficient mitigation.
The Steam Team · Water damage restoration service · 4.8 (334 reviews)1904 W Koenig Ln, Austin, TX 78756Offers 24/7 emergency water damage restoration services with certified technicians and preferred-vendor coordination with insurance carriers.
If you suspect mold growth after experiencing water damage, it's crucial to act quickly. Look for visible signs such as discoloration, fuzzy growth, or musty odors. Conduct a thorough inspection of hidden areas like behind walls and under carpets. If you notice any signs, consider contacting a professional mold remediation service. They can perform testing to confirm mold presence and provide safe removal. Early detection is key to preventing health issues and further property damage.
When selecting a water damage restoration company, consider their certifications, experience, and customer reviews. Look for companies that are IICRC certified, as this indicates they follow industry standards. Check their response time, especially for emergency services, and inquire about their insurance coordination capabilities. A reputable company should provide clear estimates and a detailed plan for the restoration process. Additionally, ask for references to gauge their reliability and quality of service.
Health risks vary significantly based on the water category involved in the damage. Category 1 water is generally safe, but if left untreated, it can become contaminated. Category 2 (gray water) may contain harmful bacteria and chemicals, posing health risks if ingested or if it comes into contact with skin. Category 3 (black water) is highly contaminated and can cause serious health issues, including infections and gastrointestinal problems. Always prioritize safety and consult professionals for cleanup of contaminated water.
To prevent future water damage, conduct regular maintenance on your plumbing and appliances. Inspect hoses, seals, and pipes for wear and tear, and replace them as needed. Ensure gutters and downspouts are clear and direct water away from your foundation. Consider installing water alarms in high-risk areas like basements and near appliances. Additionally, keep an eye on weather forecasts and take proactive measures during heavy rain or storms to minimize risks.
For a successful insurance claim, document the damage thoroughly. Include time-stamped photos and videos of the affected areas, a detailed inventory of damaged items, and receipts for any emergency mitigation efforts. Make sure to note the cause of the water damage and the steps taken to mitigate further issues. Keeping a chronological record of communications with your insurance adjuster can also help streamline the claims process and ensure all necessary information is provided.
Signs that you need professional help include persistent standing water, visible mold growth, or water damage affecting structural elements like walls and ceilings. If you notice a musty odor or if the water source is contaminated (Category 2 or 3), it's essential to call in professionals. Additionally, if you feel overwhelmed by the extent of the damage or if DIY efforts are not yielding results, seeking expert assistance can ensure proper remediation and prevent further complications.
Understanding the critical steps for effective water damage cleanup empowers homeowners to act swiftly and minimize long-term damage. By recognizing the different water categories and their implications, you can make informed decisions that prioritize safety and preserve property value. Engaging with certified professionals ensures a thorough restoration process, streamlining insurance claims and expediting recovery. For immediate assistance, reach out to a trusted local restoration provider today.
Our mission is to provide you with the most outstanding service experience ever. Some of our most popular services include Carpet Cleaning, Tile Cleaning, Air Duct Cleaning, Water Damage, Fire Damage Restoration and Construction Services.
Quick Cleaning Quote
Email: info@thesteamteam.com
Georgetown: (512) 868-0358
Dallas: (214) 631-8326
Naples, FL: (239) 450-1936
Toll Free: (800) 880-7785